


.png)

Since its inception on February 14, 2005, YouTube has revolutionized the way we consume video content.
Fast forward to 2024, and it's clear that learning how to make a YouTube video is an invaluable skill.
And recent YouTube Statistics back this up too!
With The Social Shepard citing a staggering 2.7 billion active monthly users as of 2024, YouTube's expansive reach is undeniable.
For aspiring content creators and businesses, YouTube now stands as a bustling digital avenue with a huge potential to build a loyal audience.
The surge in video content popularity means that establishing a presence on YouTube can significantly elevate your competitive edge in any niche.
In other words, learning how to make a YouTube video isn’t an option anymore, it’s quite literally a necessity if you want your business to get noticed in today’s competitive digital world.
So, how does one navigate this vast, dynamic platform?
How can new creators embark on the journey of making their YouTube videos in 2024?
This guide is your comprehensive roadmap on how to make a YouTube video.
It details every step from initial keyword research and crafting a YouTube intro to the final touches of SEO optimization to ensure your videos stand out in today’s crowded YouTube landscape.
If you're brimming with ideas but unsure where to begin, let this step-by-step guide simplify the dynamic process of how to make a YouTube video for you.
Broadcast2World is here to assist you in your YouTube journey with engaging animated videos.
Curious about how this works? Simply fill out the form below to discover more.

But before you dive headfirst into the creative process, it's crucial to understand the foundations of video creation.
Let’s explore these foundational aspects of making a YouTube video further in our upcoming section
Before you hit the record button, it's crucial to thoroughly research your video topic.
Start by identifying your niche and understanding what your audience is interested in.
Look for trending topics or frequently asked questions in your field.
Use tools like Google Trends, Exploding Topics, or YouTube's search bar to see what people are searching for.
If you’re researching your video topic using YouTube search, try doing so in incognito mode as it gives a more accurate glimpse into YouTube search results.
Make a list of keywords that other people are searching for on YouTube and study essential keyword metrics like keyword search volume and SEO difficulty.
A well-researched topic ensures that your video is relevant and has the potential to attract the right viewers to your channel.
Once you've settled on a topic, spend time watching similar videos.
Observing what others have done gives you insight into what works and what doesn't.
Note the video length, style, and anything that helped such similar videos receive high engagement.
Most importantly, see the content that these similar videos are covering and set a baseline for what you will cover in your video.
In other words, you need to cover all the topics that these videos cover and give it your own take to not only make it unique but to also outrank those similar videos.
Also, make a note of the target keywords they are using in their title and description. This will play a major role during your keyword research process.
This step isn't about copying others but rather understanding the landscape of what people are watching in your niche and finding a unique angle for your video.
A good explainer video script is your video's backbone.
It guides your narrative and ensures you cover all necessary points clearly and concisely.
Start with an outline, breaking down your video into an introduction, body, and conclusion.
Try breaking down your video into short sections or chapters during this scripting phase.
This will subsequently help viewers easily navigate through your video (more on this in our section on writing an SEO-friendly description).
This can also help you identify opportunities to repurpose your video content as short clips which can then be uploaded as YouTube Shorts or Instagram reels to get more traffic to your video.
We discuss this in detail in our section on sharing your video to social media.
Write conversationally, as if you're talking to a friend, keeping sentences short and to the point to maintain viewer engagement.
Keywords are crucial for discoverability on YouTube.
There are two methods to find relevant and trending keywords for your video.
Using YouTube’s search engine or using various online keyword research tools.
To find relevant keywords for your video topic manually, open YouTube in incognito mode.
From the previous step on observing similar videos covering your video topic, take out the list of keywords you made when watching those videos.
Search those keywords on YouTube and choose the keyword that gives results most relevant to your video topic.
The second method includes using keyword research tools like VidIQ and TubeBuddy for more advanced and detailed keyword research using metrics like search volume and SEO strength.
This video from VidIQ’s YouTube channel elaborates further on the importance of keyword research for YouTube.
Once you have a keyword, it’s time to craft an engaging title with that keyword.
Ensure the target keyword comes first in the title and is clear and concise so viewers know exactly what your video is about.
You can either come up with a title manually or use tools like ChatGPT or other online YouTube title generators to craft an engaging title with your target keyword.
A well-chosen title improves your video's chances of being found by the right audience and TubeBuddy shows how you can do that in this video.
The video thumbnail data by Lemonlight found that 90% of the best-performing videos on YouTube have custom thumbnails.
Your thumbnail is the first thing viewers notice, so it's important to make it count.
To make your thumbnail visually appealing, use high-quality images and bold, readable text to convey what your video is about.
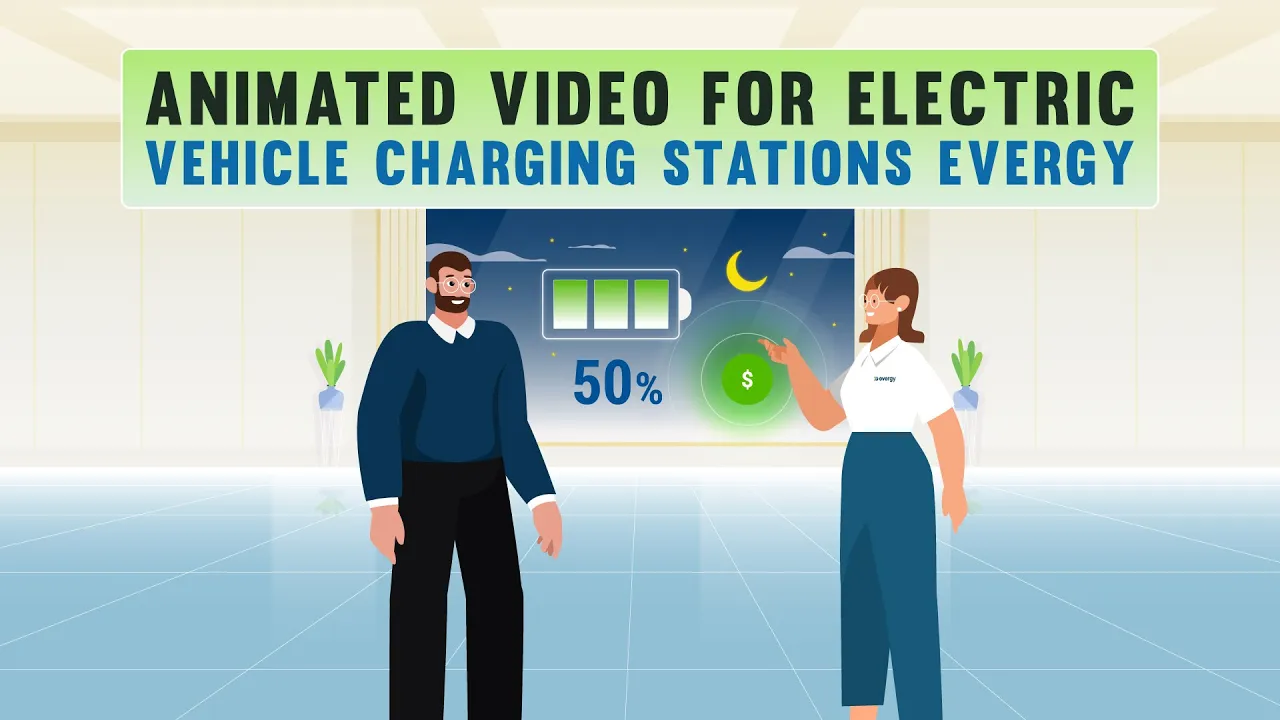
As an example, here’s the thumbnail we made for a video for one of our clients, Evergy, a company specializing in fleet electrification.
Notice how we use bright colors, expressive faces, and clear contrasts in the thumbnail.
Using such design elements ensures it accurately reflects the content you’re covering and also grabs the attention of your target audience.
While Adobe Photoshop is the most popular design tool used to make custom thumbnails, free alternatives like Canva and GIMP can also be used.
But if you’re new to making custom thumbnails, this Think Media video shows you how to make a thumbnail in less than 3 minutes!
Now that you have the basics right, it’s time to make the video.
It involves steps ranging from planning out your video sequence to picking the right video editing software even before you press record.
We cover all these steps in detail in the next section.
Before recording, plan the sequence of your video. This means deciding the order of scenes and what you'll say or show in each part.
Think of it like a roadmap guiding your video's flow. A clear plan helps prevent mistakes and ensures your video is structured and coherent.
Using techniques like storyboarding can significantly simplify this process and help you visualize your video sequence with ease.
Choose a quiet, well-lit area for recording. Ensure the background is tidy and relevant to your video's theme.
Good lighting is crucial, so either use natural light or invest in some basic lighting equipment.
The space should be consistent with the tone and style of your video, whether it's professional, casual, or creative.
If you’re into animated video production, then having a recording space isn’t necessarily required, which can save you a lot of resources.
Your equipment doesn't have to be expensive, but it should be adequate.
At a minimum, you'll need a camera or a smartphone with a good-quality camera, a microphone, and a tripod or stable surface to place your camera.
Good audio is as important as good video, so consider using an external microphone if your camera's built-in mic isn't great.
Using good audio software like Audacity or Adobe Audition can help you record and edit your voiceovers for your video with ease.
Last but not least, a computer that has the necessary specifications to run video editing and audio recording software.
This video by Think Media can help you pick the right recording equipment for your YouTube videos with their comprehensive checklist to guide you.
For animated videos, a good microphone for voiceovers and a computer that can run animation software like Adobe After Effects or Blender will do the job.
Choose a video editing software that suits your skill level and needs.
Options include online YouTube video editor tools that offer both free and premium versions, catering to varying expertise levels from beginner to professional.
Look for software with a user-friendly interface and the necessary features like cutting, adding text, and adjusting audio so you can get started immediately and get a feel for the editing software.
Popular choices include Adobe Premiere Pro, Final Cut Pro, and Davinci Resolve (just to name a few).
If you're a beginner video creator, Movavi Video Editor is a suitable option, offering an intuitive interface and essential editing tools.
Here’s a video from the YouTube channel Howfinity, that breaks down some of the most popular video editing software for beginners and advanced users.
With everything in place, it's time to record your video.
Stick to your script and sequence plan, but don't be afraid to add spontaneous elements if they feel right.
Keep your energy up, and remember to speak clearly and at a moderate pace.
Record multiple takes if necessary, so you have options when editing.
After shooting, review your footage to ensure you've got everything you need before moving on to post-production.
Now comes the fun part where all the magic happens.
The post-production phase is like putting together a puzzle where you organize and put together all the pieces to produce a cohesive and visually appealing YouTube video.
Let’s look at how you can do that in the upcoming section.
After filming, organize all your video clips and any additional assets like music, images, or graphics into one place.
Create folders on your computer to keep everything tidy and easily accessible.
Label each file clearly so you can quickly find what you need.
This step will save you time and frustration when you import all the assets into your video editing software to start editing.
If you also create supporting graphics in Photoshop, optimizing settings like Photoshop caches can help maintain smoother performance across larger creative projects.
To help streamline the file management for your video editing process, we recommend watching this video from professional video editor and filmmaker Peter Lindgren.
Open your chosen video editing software and import your video clips and assets.
Most software offers a simple drag-and-drop feature to get your files into the project but the layout can vary from software to software.
Once everything is imported, lay out the clips on the timeline in the rough order you plan to use them.
This sets the foundation for your editing process.
Refer to our section on choosing the right video editing software to pick the right software for your YouTube videos.
Now, start shaping your story—download our free eBook on storytelling to guide you through the process.
Using a video editor, trim clips to remove unnecessary parts, arrange them to flow smoothly, and add transitions between scenes if needed.
Pay attention to the pacing and rhythm of your video. Insert any additional assets like music or graphics, and adjust audio levels for clear, balanced sound.
Remember, editing is where you bring your video to life, so take your time to get it right.
If you’re new to video editing, this training video from Youtube Creators is a good starting point to get familiar with the basics of video editing.
With the main editing done, focus on the finishing touches.
This includes color correction and color grading to ensure your video looks vibrant and professional, adding text or titles for context or emphasis.
Including effects or filters can greatly enhance the visual appeal of your videos and make them feel eye-catching and engaging to the viewer.
Using video transitions between cuts can make your video flow well and feel cohesive to the eyes of the viewers.
To further enhance engagement in your video, try adding subtitles.
There’s a very good reason for it too.
An article on video subtitles by Kapwing reported that 80% of viewers were more likely to finish a video when it had subtitles in it.
You can manually add subtitles through your video editing software or through YouTube.
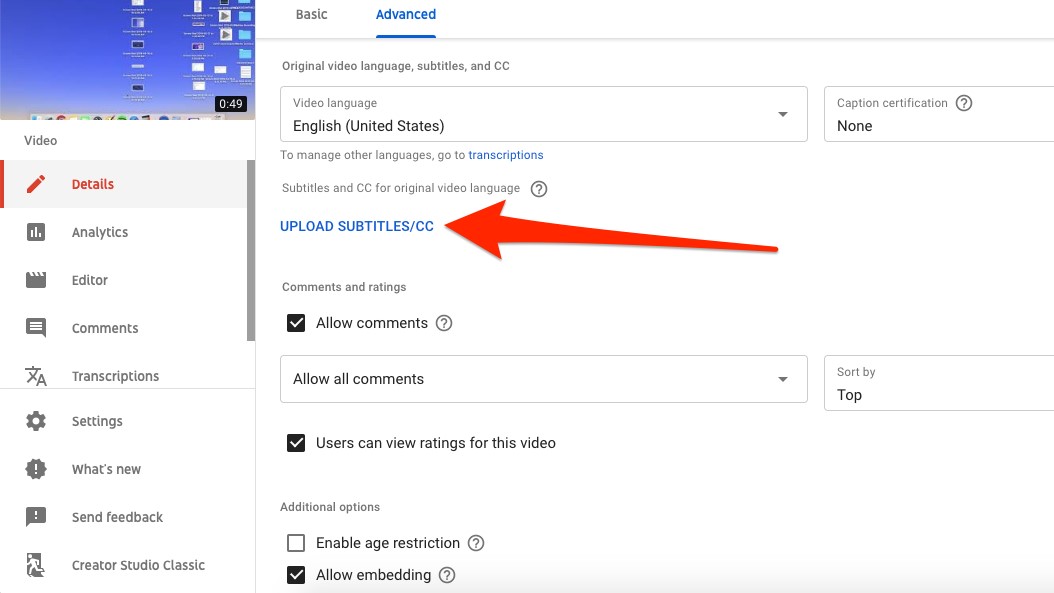
YouTube gives you the option to manually upload your subtitles to your video during and after your video uploading process.
If you’re uploading your subtitles after your video has been uploaded, you can find the option by going to “Content” on your YouTube studio, selecting the video, and scrolling down in its details as shown here
With advances in YouTube’s language processing, YouTube can now auto-generate your video’s subtitles in multiple languages with good accuracy.
This essentially lets you skip the process of manually uploading your subtitles and expedites the video uploading process.
We talk about the process of uploading your YouTube video in detail later in this blog.
Finally, watch your video multiple times to catch any errors or areas for improvement and incorporate those in the video as attention to detail matters.
Once you're satisfied, your video is ready to be exported and shared with the world.
After thoroughly reviewing your video and making all necessary edits, it's time to export.
Choose the format and resolution suitable for YouTube (typically MP4 and 1080p or higher).
Check the export settings to ensure the best quality and file size balance.
Once exported, preview your video one last time to ensure everything looks and sounds as it should.
Now, you're ready to upload your masterpiece to YouTube!
But just uploading your video to YouTube isn’t the final step.
There are certain steps before, during, and after you upload your YouTube video that help it reach the right audience and have the impact you desire.
Let’s look at these steps in detail in our section on video optimization next.
Before uploading your video, ensure your YouTube channel is set up correctly.
Verify your account to unlock advanced features like custom thumbnails and longer videos.
Familiarize yourself with YouTube's upload settings, including privacy settings, category selection, and language.
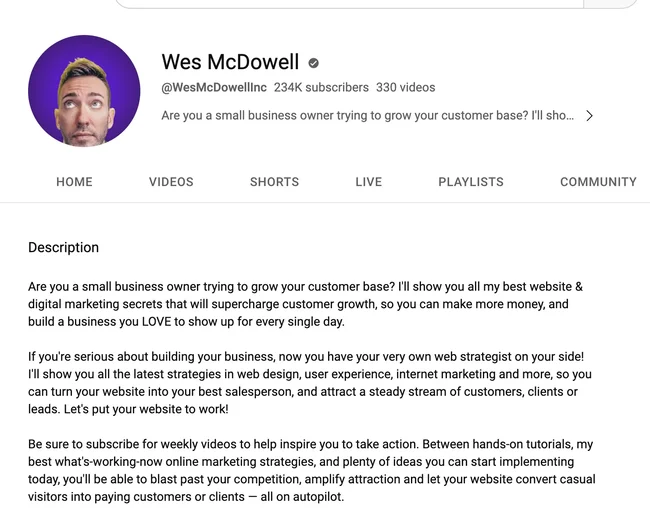
The first step towards setting up your YouTube channel is to write a channel bio like this one from Wes McDowell’s YouTube channel.
Keep your channel bio brief and mention only the important details about what your channel is about and the content it covers.
Now let's direct our focus to our channel URL.
Once you create a new YouTube channel, YouTube designates a unique URL for your channel.
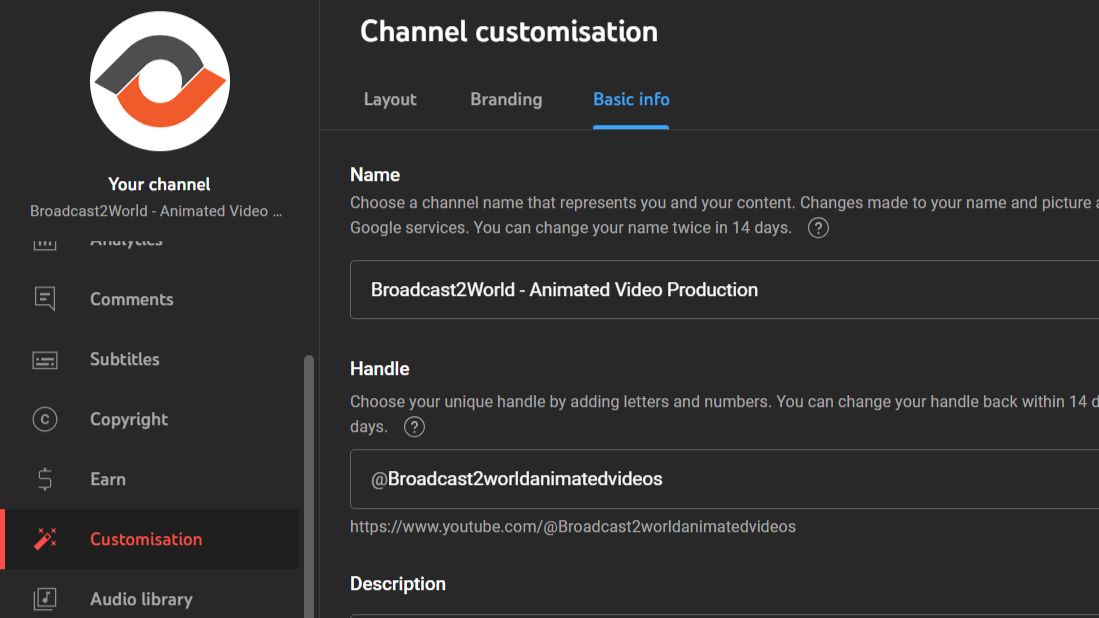
But with recent updates, you can now add a custom YouTube handle unique to your channel.
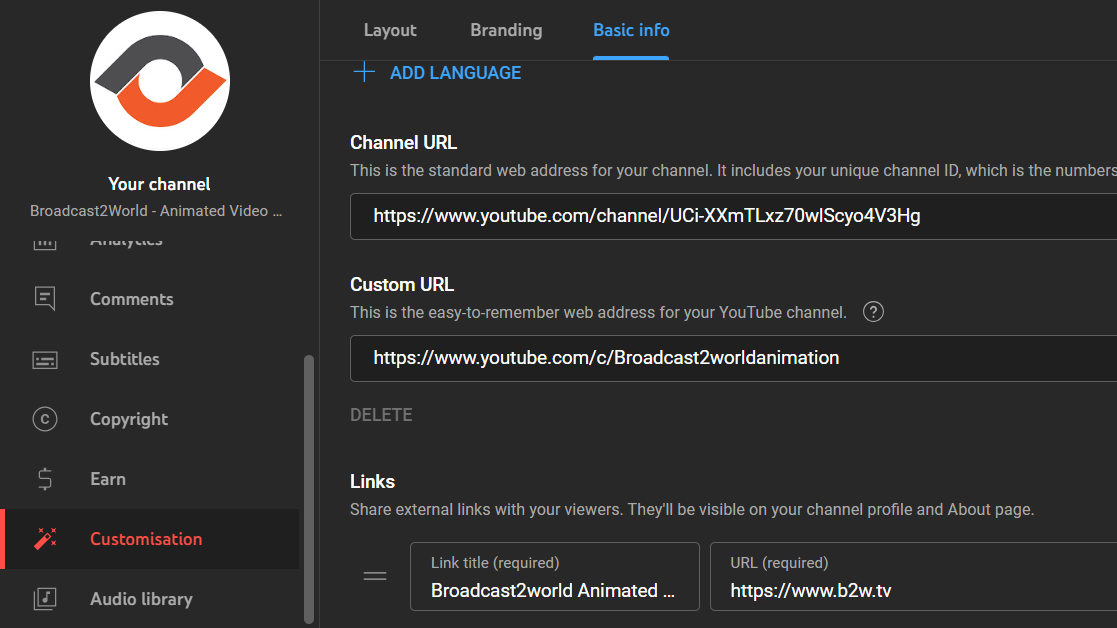
To add/customize your YouTube handle, go to YouTube Studio select “Customization” settings, and head over to “Basic Info” where you will see your channel name and your custom channel handle
If you haven’t set a custom handle yet, it will only show your channel name here.
Once your channel handle is set, scroll down a bit in this “Basic Info” section and you will find your original channel URL and the custom URL with your new handle as shown here.
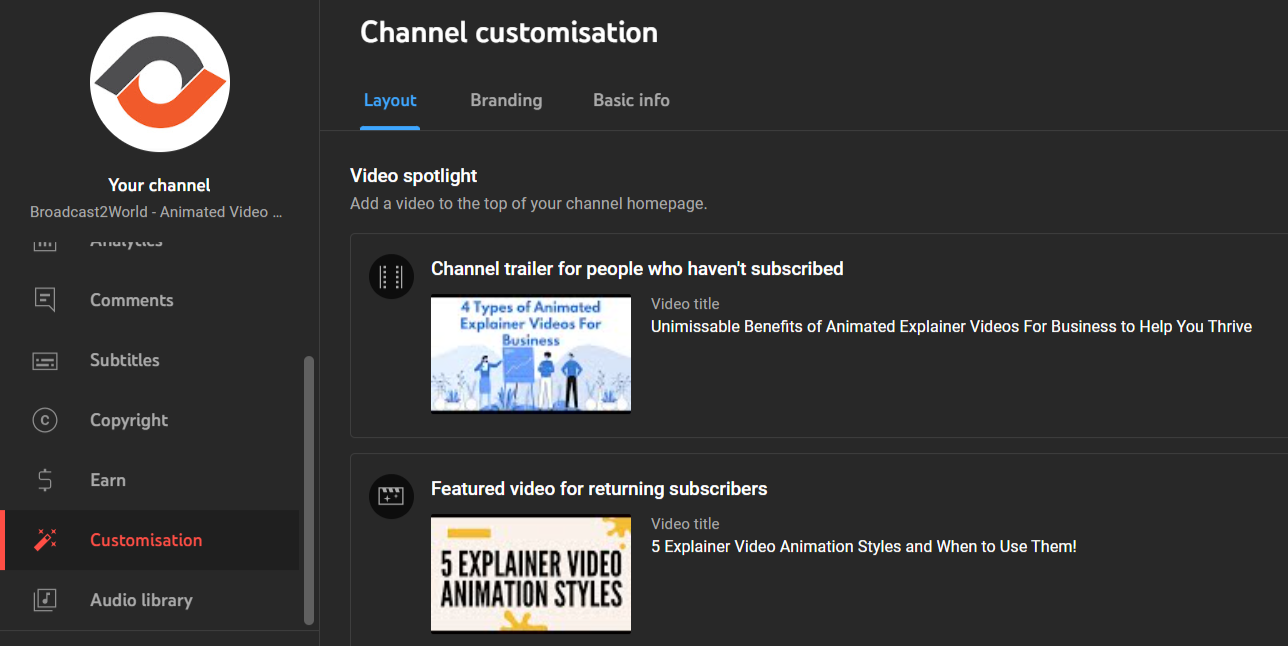
Many YouTube channels have a channel trailer or a best-performing video that they show their audience every time they visit their channel.
YouTube lets you feature such videos on your channel through what they call “Video Spotlight”.
In the “Customisation” settings, head over to the “Layout” section where you can add a short channel trailer for new subscribers and a featured video for existing subscribers as shown here.
These basic yet impactful preparatory steps ensure a smooth upload process and that your video is categorized correctly.
This step-by-step tutorial video from Think Media takes you through the entire process of setting up your YouTube channel in just under 6 minutes.
Now it’s time to upload your video to YouTube so it can reach your target audience.
And it all starts with writing an SEO-friendly description as that’s the major component that will help your video get discovered
The first step towards writing an SEO-friendly description is to include your target keyword naturally at various places in your description.
Add your target keyword in the initial first lines of the description so that the video can rank higher in YouTube’s search results and enhance search visibility.
Also, include necessary links in the first line in case you want to divert viewers to any relevant resource that you want them to see.
Start with a compelling summary of your video in the first few lines explaining what your video covers in brief. This step is crucial for viewer engagement.
Once these are done, add other important links like credits for material used in the video and your social media handles at appropriate places in the description.
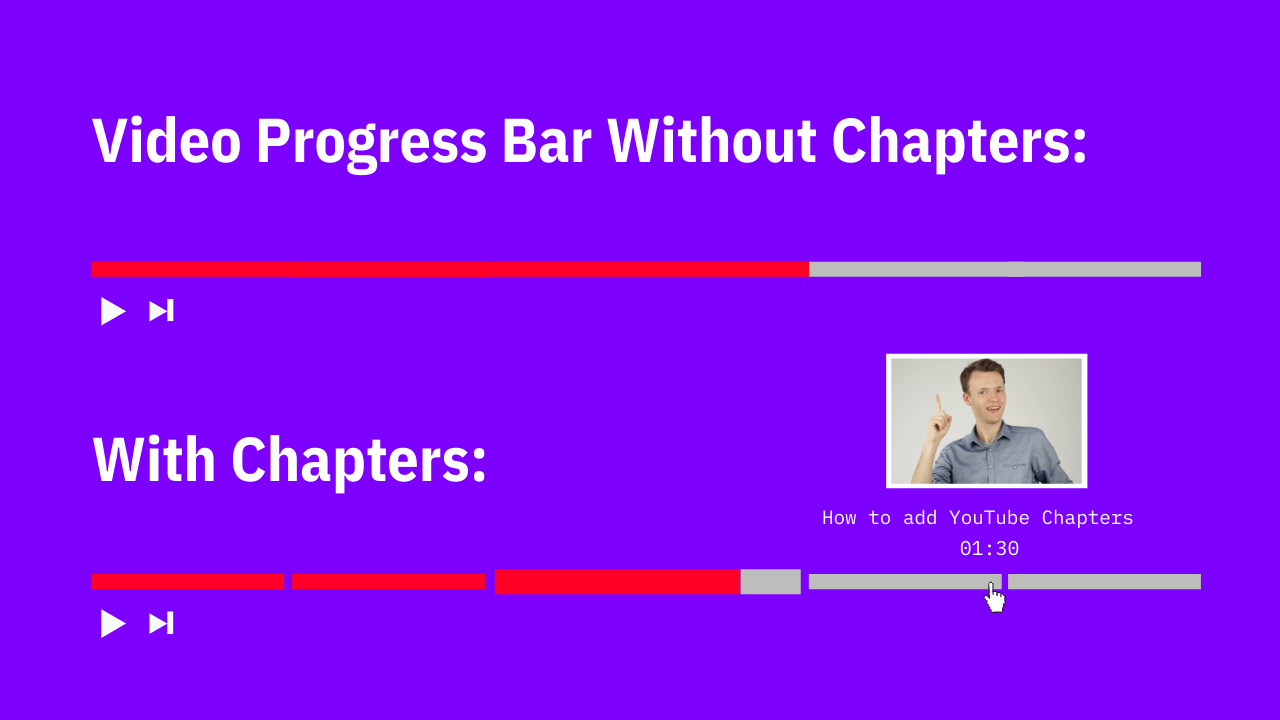
If your video is a bit long, include timestamps and a one-line description of the various sections covered in the video as shown here.
YouTube identifies these timestamps as chapters and automatically divides your video content into sections based on those timestamps which look something like this.
If you have a couple of videos on your YouTube channel that are relevant to the content of your new YouTube video, add those videos to your description too.
This way you can direct viewers to additional content on your channel and get more views and engagement in terms of likes and comments.
Finally, add hashtags to your videos that are relevant to your video topic and overall content being covered.
This further helps viewers find your video on YouTube in case they are searching through hashtags.
Throughout this entire process, ensure the structure of your description is well spaced out and even so that it's easier to navigate for the viewer when they read the description.
Remember, a well-crafted description boosts your video's discoverability and provides viewers with valuable information at a quick glance.
Go to YouTube's upload page and select your video file.
Including your target keyword in the file name of your video helps you identify the video quickly during uploading.
This also plays a huge role in SEO as the file name gets included in the metadata of the video along with the title, description, and tags.
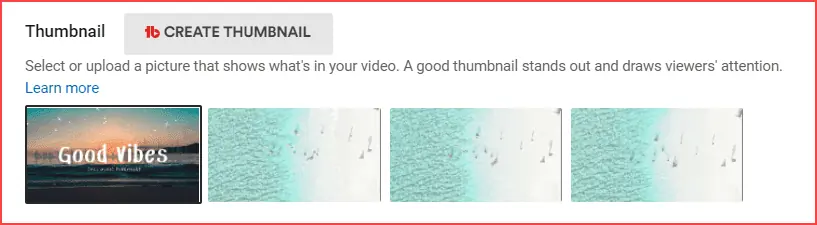
While it's uploading, start filling in the title and description in the boxes as shown here.
Once they are added, upload the custom thumbnail that you have designed for this video as shown here.
Next, create a playlist on YouTube or add the video to a playlist if already created.
This helps you organize your content and also helps the viewer easily find similar videos you have made, all in one place.
Once you make a new YouTube playlist or add your videos into your existing playlists, it will look something like this
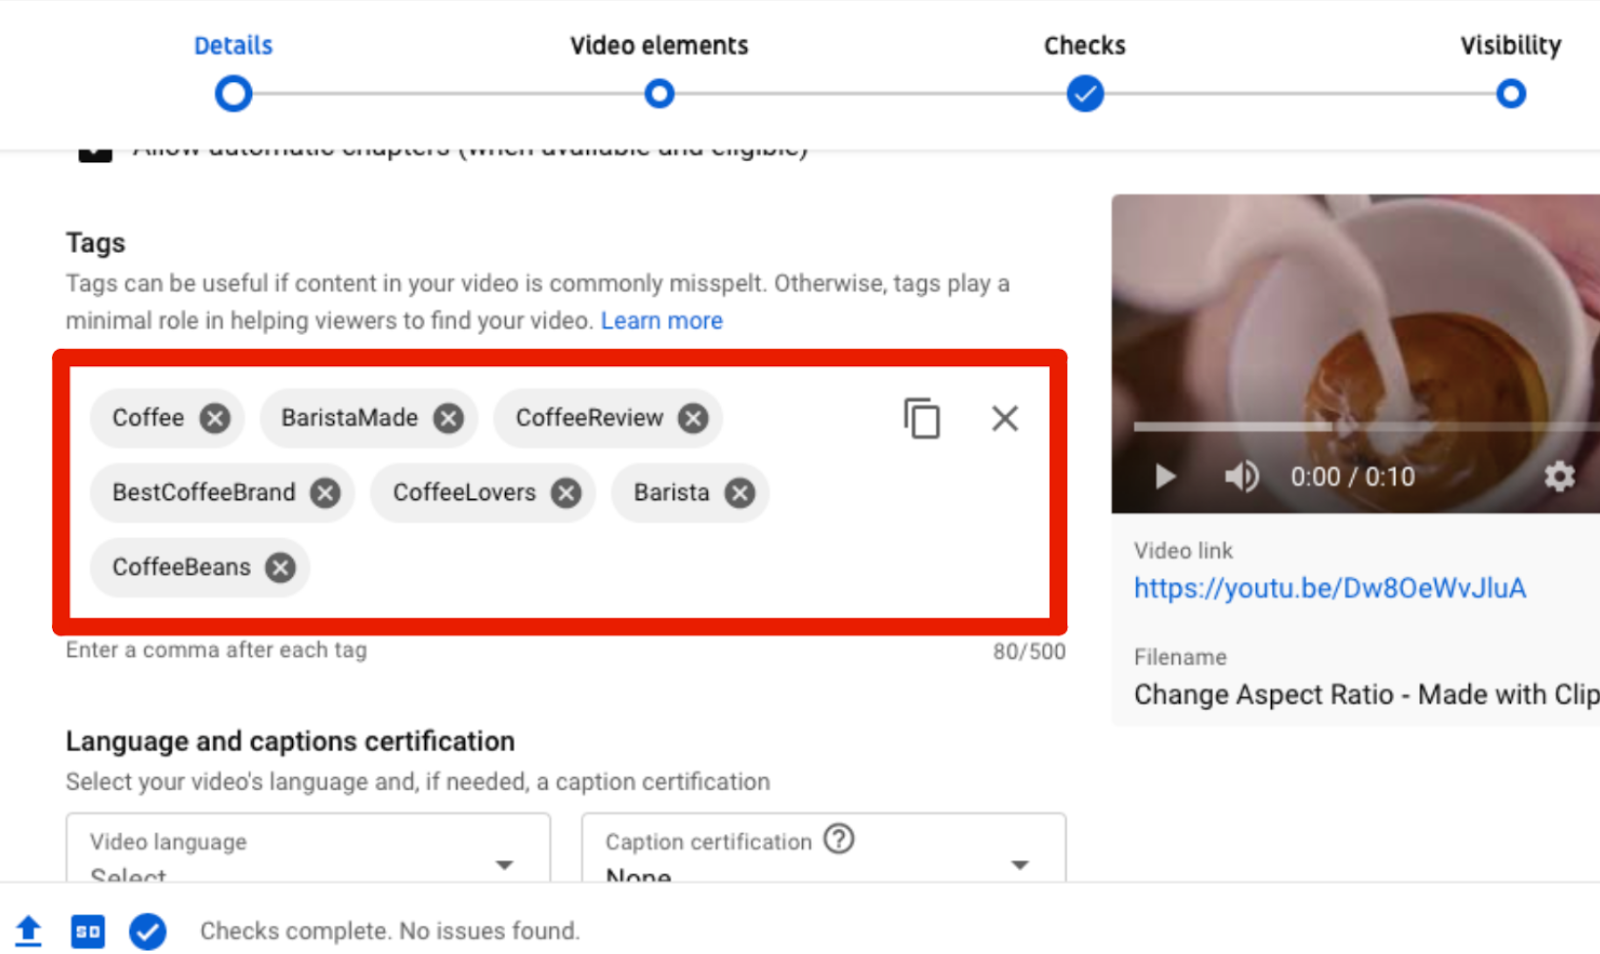
In order to help the YouTube algorithm better understand the content of your video, YouTube allows creators to add tags to their individual videos.
Basically, they are high-ranking keywords related to your video content and act as a metadata that helps your YouTube videos rank in relevant search results.
To add tags, scroll down in the “Details” section till you see this part for adding tags.
Add 3-5 tags that are relevant to your video topic and keep the total number of tags to 10 at best.
Avoid using excessive tags as that might confuse the YouTube algorithm and diminish the initial traction of your video when it goes live.
VidIQ explores the process of adding tags the right way in this video here.
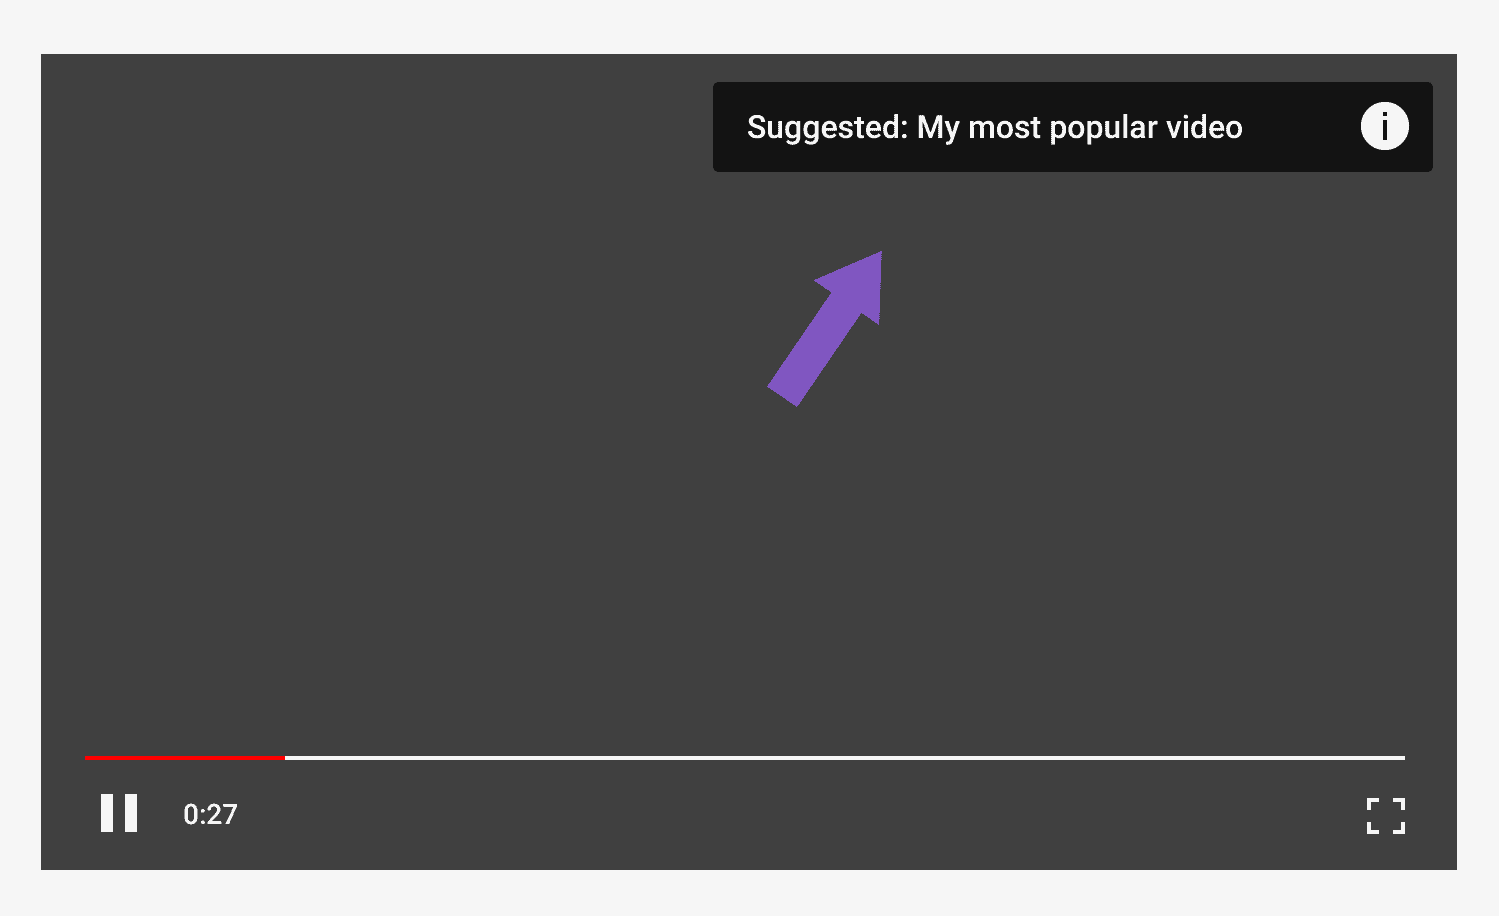
Once the basic information of your video is added, head over to video elements to add YouTube cards and an end screen.
YouTube cards are similar videos that you have set to appear like this during the video.
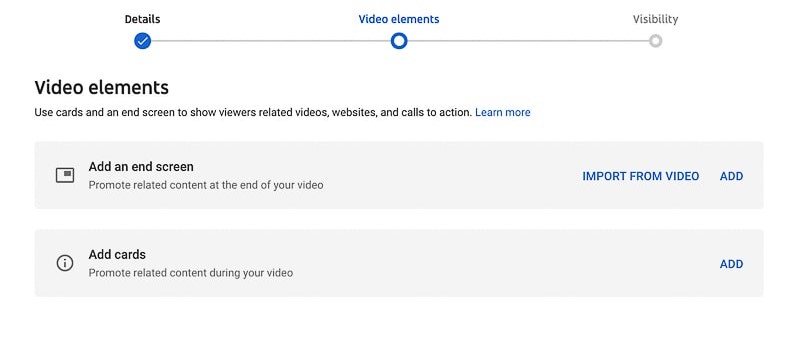
To add cards, in the “Video Elements” and you will see the option to add cards and an end screen like shown here
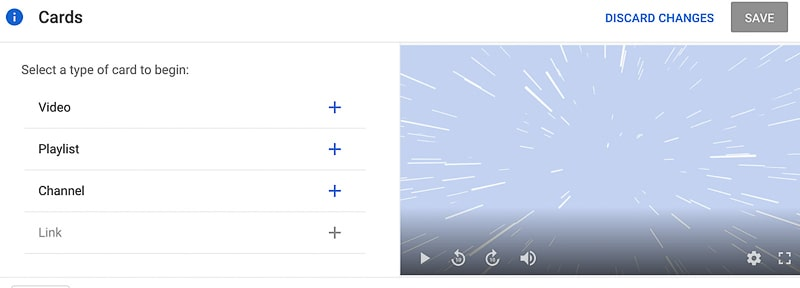
When you click on “Add Cards”, you will be redirected to this interface.
Here, you can add either a similar video, a playlist or a channel to appear at a specific time during your video.
Have a look at this short video by Beginner YouTube Tutorials to learn how to add cards the right way.
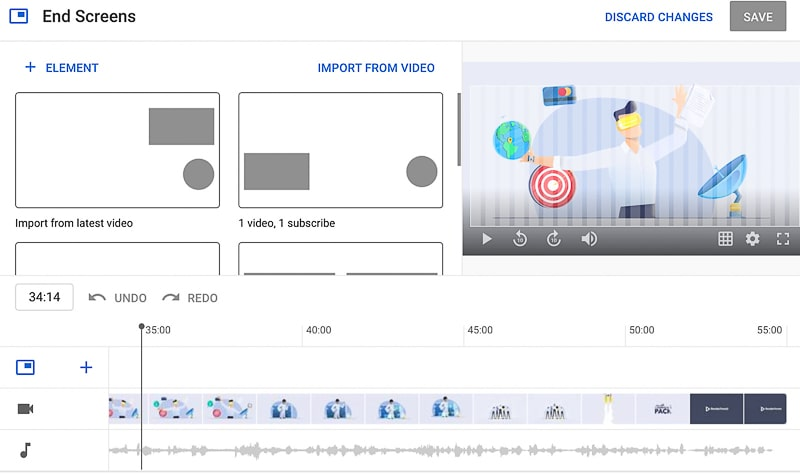
Now it’s time to set up an end screen to your YouTube videos.
The end screen is a great tool to direct viewers to watch more of your content or subscribe to your channel after your video concludes.
To do that, head over to the “Add an End Screen” section and it will direct you to this interface.
Here you have the option to make an end screen from scratch or import one from your previous uploads to save time.
To learn more about end screens on YouTube, watch how Think Media covers the process of making an end screen in this video
Once your video elements are set, it's time to move on to the “Visibility” section where you finally upload/schedule your video.
Make sure to select the right privacy setting: Public for everyone to see, Unlisted for a private link, or Private for personal viewing.
If you’re scheduling your video on a later date, YouTube automatically sets the video to Private and makes it Public on the date when the video will go live.
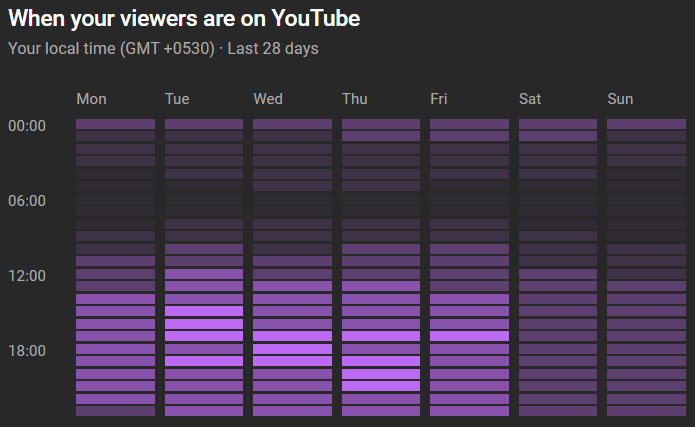
In such a case, it’s important to choose the best time for your video to go live, considering when your audience is most active.
As an example, Broadcast2World YouTube channel’s upload schedule includes posting a new video twice a week at 5:30 AM EST.
But how do we know that 5:30 AM EST is the right time to upload our videos?
YouTube tracks our video engagement after the video goes live and presents it in the “Audience” section of YouTube analytics and it looks something like this
Using this chart can help you determine when your viewers are most active on YouTube so you can tweak your upload schedule to get maximum views on your YouTube video once it’s uploaded.
It’s important to have a consistent upload schedule so your viewers know when to expect your videos and subsequently build trust and loyalty with your audience in the long run.
This video by Primal Video shows you the process of uploading or scheduling your YouTube videos in much more detail.
Once your video is live, it’s important to create a buzz around your new YouTube upload to get initial traction to your videos.
YouTube gives channels the ability to share their new video on YouTube itself through their Community Posts, given your channel meets the required eligibility to unlock Community Posts.
Sharing your YouTube video’s link to popular social media platforms like Facebook, Twitter, Instagram and LinkedIn — or even adding it as a YouTube link in bio on platforms like Instagram or TikTok — can help you build a social media presence around your content while also attracting viewers to your videos.
Tailor your message to each platform to engage your followers.
Encourage friends, family, and followers to share your video. The more you promote your video, the more views and engagement you'll receive.
With short-form video content on the rise, using a short clip from your longer video to promote it on YouTube shorts or Instagram reels is a great way to get more viewers to your longer videos.
It also enhances your social media presence and thus becomes an avenue to gain additional audience on social media.
Optimizing your YouTube videos is not a one-time task but a continuous effort crucial for achieving long-term success and ensuring sustained visibility among the desired audience.
To keep your content relevant and engaging, it's essential to understand when and how to apply optimization strategies effectively.
Regularly monitoring your video analytics in YouTube Studio is foundational.
This data helps you understand viewer preferences and behaviors, guiding you to make informed decisions.
For instance, if you notice an unexpected drop in engagement in the form of stagnated views, it's prime time to review and optimize your video's metadata, including titles, descriptions, and tags, to align with current trends and audience interests.
Engaging with your audience by responding to comments and creating community posts to promote your new upload is also a form of dynamic optimization.
It keeps the conversation going and can provide insights into what your audience wants to see, allowing for more targeted content and metadata updates.
Tools like VidIQ and TubeBuddy can significantly streamline the optimization process, offering insights and suggestions based on performance and trends.
Utilizing these tools can help you decide when and what to optimize, taking some of the guesswork out of the process.
However, for beginners, the realm of YouTube SEO might seem daunting due to its many components.
To demystify this, resources like this video from Hubspot Marketing can be invaluable.
It breaks down the process into understandable steps so you can start optimizing your videos effectively when the need arises.
There are several elements that contribute to videos gaining many views on YouTube, such as humor, tragedy, sports, and current news.
This section highlights videos that have achieved a large number of views in a relatively short period of time, known as viral videos.
Below is a compiled list of 10 types of viral videos from which valuable insights can be drawn.
Some of these videos may already be familiar, but the aim is not to provide a list of the most watched videos but to share different types of viral videos from which valuable lessons can be learned.
On the surface, there is nothing about this video that would obviously make it go viral.
It’s a simple, animated explainer video and slightly longer than the ideal 60 seconds that 50% of viewers prefer.
It has a staggering 73M views on YT!
However, digging deeper reveals traits that helped this video become viral.
First, it answers a question of global interest, giving it broad appeal and making it highly shareable.
Additionally, the simple layout and continuous flow of the animation make it a captivating watch.
This charming animation delivers a powerful punch at the end.
It’s not just the contrast between the cheerful, colorful characters and the impactful message that made this video go viral—the music plays a huge role too.
The catchy song can stay in your head for days (trust us on this!).
The track has been downloaded hundreds of thousands of times, and the original video has been watched over 220 MILLION times!
If we had a list of companies with the most products sold through YouTube videos, GoPro would undoubtedly rank high.
With over 470 videos on their YouTube channel and a total of 258 million views, GoPro has effectively leveraged the platform for marketing.
One of their key strategies has been giving away promotional GoPro cameras to athletes, who then share their videos.
The latest GoPro video has amassed 22 million views in just eight months, an impressive number for a five-minute video.
We can’t discuss viral marketing videos without mentioning the incredible Dollar Shave Club video.
This product launch video made a significant impact, amassing 3 million views within the first few days.
But the success didn’t stop there—just one day after the video was posted, the previously unknown startup gained 12,000 new subscribers.
The video’s humor, unique style, and distinctiveness from other marketing videos of its time created a perfect recipe for viral success.
This video addresses a question of significant public interest.
It employs bright animations and smooth, captivating transitions, making it an easy and engaging watch.
The video is both entertaining and informative, incorporating numerous pop culture references while breaking down the topic—artificial intelligence—into digestible chunks of information.
Additionally, its release was timed with an original research paper published by HubSpot, enhancing its online presence and impact.

This Old Spice ad is a 30-second masterclass in viral video marketing, boasting over 60 million views!
This humorous and original video flips traditional advertising on its head by targeting women for a product designed for men.
With an incredible script and high production quality, the ad appears to be shot in a single take, featuring Isaiah Mustafa speaking directly to viewers and maintaining eye contact throughout.
When Volvo wanted to demonstrate the stability and precision of their dynamic steering, they made a bold move: hiring Jean-Claude Van Damme to do the splits between two of their trucks.
This video had all the ingredients for success: Van Damme, Enya’s music, and a stunning Spanish sunset.
While not everyone has the budget for such an elaborate setup, one aspect of the video that you can emulate to boost your video's viral potential is the one-take shot.
One-take videos can captivate audiences, especially when they feature an impressive stunt!
Announcing a new product is a monumental moment, and you only get one shot at it.
When Greggs introduced their new vegan sausage roll, they crafted an unforgettable video campaign.
This clever video parodies the iconic Apple ads by presenting the sausage roll as if it were a new smart device.
The tech-inspired descriptions of the food item are subtly brilliant and engaging.
This innovative approach helped the video go viral, amassing over 5 million views within the first two weeks.
"Email in Real Life" takes the familiar concept of email and flips it in an unexpected way.
Filmed in a sitcom style, this video humorously reveals the absurdities of ‘email talk’ through an outstanding script and a talented cast.
The video's unique approach caught the attention of numerous publications, including The Huffington Post, Fast Company, and Bustle, highlighting its widespread appeal and creative brilliance.
Unlike many viral brand videos, it's clear why this heartwarming story captured widespread media and public attention.
Thirteen-year-old Shubham's empathy and technological skills are equally inspiring.
His invention offers over 200 million blind people an affordable way to read, making this a truly shareable story.
Making a YouTube video on mobile is straightforward thanks to a variety of user-friendly apps and the improving quality of smartphone cameras. Here's a simplified process:
An article by Business Insider found that mobile devices account for approximately 40% of YouTube watch time, indicating the platform's mobile-friendly nature and the increasing trend of mobile content creation.
Which is to say, getting started on YouTube with just your smartphone is a very viable step towards launching your YouTube career.
Creating a compelling YouTube video doesn't have to cost anything. Here's how you can do it for free:
Focus on creating engaging, valuable content that resonates with your audience.
As your skills and channel grow, you can consider investing in equipment or software, but many successful YouTubers started with just the basics.
Creating a YouTube video is a journey that takes you from a mere concept to a piece of content that can entertain, inform, or inspire audiences worldwide.
Throughout this blog, we've walked you through the comprehensive steps of making a YouTube video, covering the pre-production planning, the production process, and the post-production touches that elevate your content.
We've also delved into the crucial aspect of video optimization to ensure your hard work gets the visibility and engagement it deserves.
Remember, the journey of creating a YouTube video is as important as the final product.
Each step, from researching your video topic to designing an eye-catching thumbnail, from setting up your recording space to picking the right editing software is an opportunity to infuse your unique creativity and vision into your work.
Whether you're a seasoned YouTuber or just starting, the world of video creation is at your fingertips.
With the right approach, tools, and a dash of creativity, you can produce videos that stand out in the bustling world of YouTube content.


Comments (1)